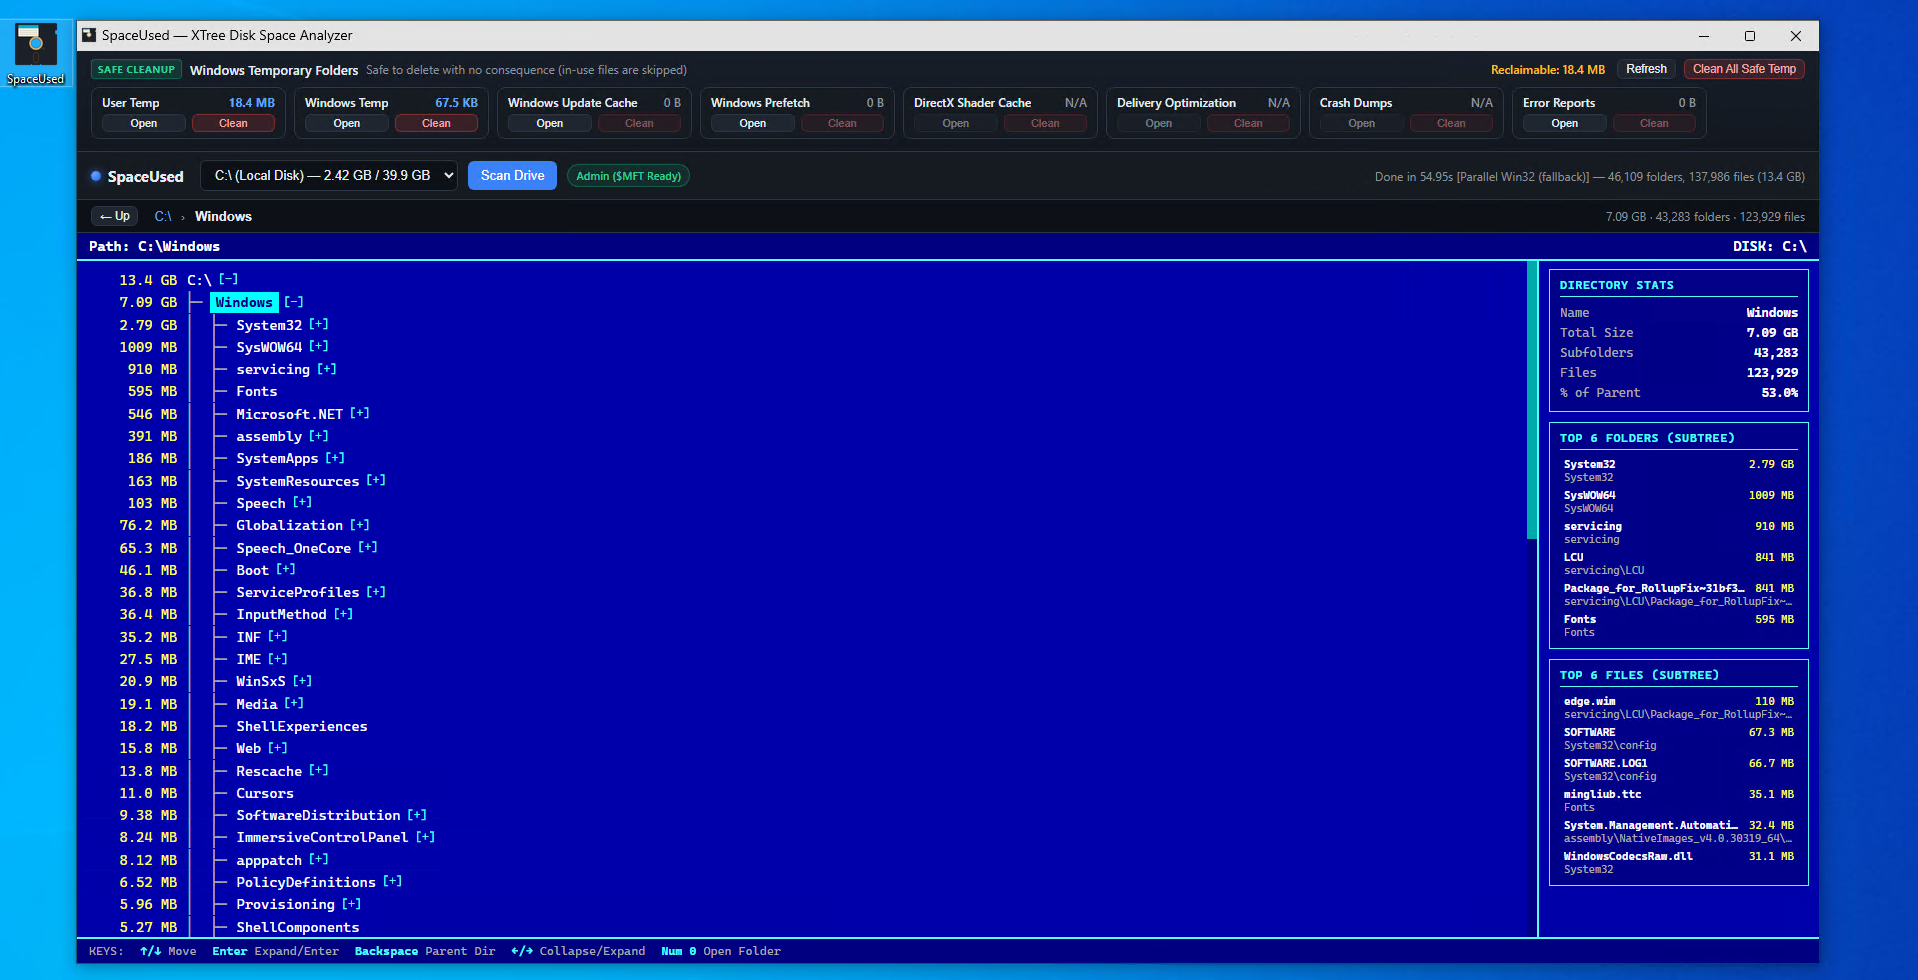
SpaceUsed
SpaceUsed is a fast Windows disk space analyzer with a classic DOS XTree-style directory browser, size-prefixed folder tree, per-directory Top 6 Folders & Files breakdown, and a built-in Safe Windows Temporary Folders cleaner.
Features
Fast Drive Scanning:
- Parallel Win32 Scan (Default): Multi-threaded directory traversal (os.scandir) that skips NTFS junctions/reparse points so C:\ is never double-counted or looped. Requires no Administrator privileges.
- Elevated NTFS MFT Mode (Optional): Click Admin MFT Mode to relaunch with UAC elevation and read the NTFS Master File Table (\\.\C:) directly from disk in 4 MB chunks—scanning an entire drive in seconds (automatically falls back to Parallel Win32 on non-NTFS drives).
Classic XTree Interface:
- Folders are prefixed with their total size and sorted largest-first at each level.
- Right-hand Directory Stats panel shows total size, subfolder count, file count, and percentage of parent.
- Top 6 Folders (Subtree) and Top 6 Files (Subtree) update live for whichever directory is highlighted, including nested subfolders.
Safe Windows Temporary Folders Bar:
- Lists common Windows temporary/cache locations at the top (User Temp, Windows Temp, Windows Update Cache, Windows Prefetch, DirectX Shader Cache, Delivery Optimization, Crash Dumps, and Error Reports) with live sizes.
- Open any temp folder in Windows Explorer or Clean its contents (with confirmation; files currently locked/in-use by Windows or running apps are safely skipped).
Usage & Controls
- Select a drive (defaults to C:\) and click Scan Drive.
- (Optional) Click Admin MFT Mode before scanning for instant NTFS MFT scanning.
- Once the scan completes, press Down Arrow (or click any folder) to start navigating the XTree.
Keyboard Shortcuts
| Key | Action |
| Up / Down Arrow | Move cursor up / down |
| Home / End | Jump to top / bottom of visible tree |
| PageUp / PageDown | Jump 15 rows up / down |
| Enter | Expand folder and enter its first subfolder |
| Backspace | Go up to parent directory |
| Right / Left Arrow | Expand / collapse folder (or jump to parent) |
| Numpad 0 (or 0 / O) | Open highlighted folder in Windows Explorer |
Mouse Controls
- Click a row to select it and view its Directory Stats, Top 6 Folders, and Top 6 Files.
- Double-click a folder to expand and enter it.
- Right-click any folder for Open Folder in Explorer, Expand / Enter Subfolders, or Copy Full Path.
- In the Top 6 panels, click any folder to jump to it in XTree, or click any file to open its containing folder in Explorer.
I want to get the space used by every folder with the lowest permissions required
Powershell
The best, show folders like the tree command with at least 1GB of space used. You can use “> c:\folders.txt” to pipe it
function f($p=’.’,$i=0){dir $p -Dir -ea 0|%{$s=(dir $_.FullName -Rec -File -ea 0|measure Length -s).Sum;$g=[math]::Round($s/1GB,2);if($g -ge 1){$x=’-‘*$i;Write-Host “$x> [$g GB] $($_.Name)”;f $_.FullName ($i+4)}}}; f “C:\Your\Folder”
$p=Read-Host “Path”; $d=[int](Read-Host “Depth (Default 1)” -Default 1); Get-ChildItem $p -Dir -Recurse -Depth $d -EA 0 -EV e | % { $s = (Get-ChildItem $_.FullName -File -Recurse -EA 0 | Measure-Object Length -Sum).Sum / 1GB; if($s -ge 1.5){ [PSCustomObject]@{ GB = [Math]::Ceiling($s); Path = $_.FullName } } } | Sort GB -Desc | FT -AutoSize; if($e){ Write-Host “`nSKIPPED FOLDERS (Access Denied):” -FC Red; $e.TargetObject | Select -Unique | % { Write-Host “[-] $_” -FC Gray } }
Similar but all.
Get-ChildItem -Directory -Recurse | ForEach-Object { $size = (Get-ChildItem $_.FullName -File -Recurse -ErrorAction SilentlyContinue | Measure-Object Length -Sum).Sum; $mb = [math]::Round($size / 1MB, 2); Write-Host “$mb === $($_.FullName)” } > folders.txt
MS Dos version
for /f “tokens=*” %G in (‘dir /ad /b /s’) do @for /f “tokens=3” %S in (‘dir “%G” ^| find /i “file(s)”‘) do @echo %S === %G >> folders.txt
I wanted to trace a LAN cable, used a laptop at one point and connected misc. ethernet cables to a switch. If than LAN goes up a audible alert sounds until unplugged.
Install phyton, pip install psutil.
# ——————————————————————-
# 1. INITIALISATION & INSTRUCTIONS
# ——————————————————————-
Write-Host “================================================================”
Write-Host “.SYNOPSIS”
Write-Host “Moves a specified number of emails from a source folder to a”
Write-Host “destination folder in Outlook.”
Write-Host “”
Write-Host “.DESCRIPTION”
Write-Host “Usage Instructions:”
Write-Host “1. Ensure Outlook is running with the same privileges as PowerShell.”
Write-Host “2. Select the SOURCE folder when prompted.”
Write-Host “3. Select the DESTINATION folder when prompted.”
Write-Host “4. Enter the specific number of emails to move (Enter 0 for ALL).”
Write-Host “================================================================`n”
# Create a COM object to interact with the Outlook application.
$outlook = New-Object -ComObject Outlook.Application
# Access the Messaging Application Programming Interface (MAPI) namespace,
# which is required to access Outlook folders and items.
$namespace = $outlook.GetNameSpace(“MAPI”)
# ——————————————————————-
# 2. FOLDER SELECTION
# ——————————————————————-
# Prompt the user with a dialogue box to select the source folder.
Write-Host “Select the SOURCE folder…”
$source = $namespace.PickFolder()
# Exit the script if the user clicks ‘Cancel’ or closes the prompt.
if ($null -eq $source) { exit }
# Prompt the user with a dialogue box to select the destination folder.
Write-Host “Select the DESTINATION folder…”
$destination = $namespace.PickFolder()
# Exit the script if no destination is selected, or if the source and
# destination folders are exactly the same (preventing an infinite loop).
if ($null -eq $destination -or $source.EntryID -eq $destination.EntryID) { exit }
# ——————————————————————-
# 3. ITEM INVENTORY
# ——————————————————————-
# Retrieve all items (emails, meetings, etc.) within the selected source folder.
$items = $source.Items
# Count the total number of items present.
$itemCount = $items.Count
Write-Host “`nFound $itemCount item(s) in $($source.Name).”
# If the folder is empty, terminate the script as there is nothing to do.
if ($itemCount -eq 0) {
Write-Host “No items to move.”
exit
}
# ——————————————————————-
# 4. USER INPUT & VALIDATION
# ——————————————————————-
# Initialise the limit variable.
[int]$limit = -1
# Create an infinite loop that only breaks when valid input is provided.
while ($true) {
$userInput = Read-Host “How many emails would you like to move? (Enter 0 for ALL)”
# Attempt to parse the input as an integer. It must be a number and 0 or greater.
if ([int]::TryParse($userInput, [ref]$limit) -and $limit -ge 0) {
break # Exit the loop if valid.
}
Write-Host “Please enter a valid number (0 or greater).”
}
# If the user enters 0 (meaning ‘all’), or asks to move more items than
# actually exist, cap the limit at the total number of available items.
if ($limit -eq 0 -or $limit -gt $itemCount) {
$limit = $itemCount
Write-Host “Setting limit to $itemCount (all available items).”
}
# ——————————————————————-
# 5. EXECUTION & MOVEMENT
# ——————————————————————-
# Calculate the index at which the loop should stop to move exactly
# the requested amount of items.
$stopAt = $itemCount – $limit + 1
$processed = 0
# Loop through the items BACKWARDS. This is critical when modifying COM collections;
# moving item #1 shifts item #2 to position #1, breaking a standard forward loop.
for ($i = $itemCount; $i -ge $stopAt; $i–) {
$processed++
# Update the visual progress bar in the PowerShell console.
Write-Progress -Activity “Moving Emails” -Status “Processed $processed of $limit” -PercentComplete (($processed / $limit) * 100)
# Execute the move command. Casting to [void] prevents the COM object
# from outputting enumeration data to the pipeline, which can cause failures.
[void]$items.Item($i).Move($destination)
}
# Clear the progress bar from the screen once finished.
Write-Progress -Activity “Moving Emails” -Completed
# Display the final summary.
Write-Host “`nCompleted. Moved $limit email(s).”
The script presents a dialog box to choose the outlook folder to export as individual messages including attachments and replicates folder structure.
The filename of the email is saved as:
Outlook_foldername-dateYYMMDD-Time-SenderName-EmailSubject.msg
Attachments are saved with the same filename appending the attachment filename eg:
Outlook_foldername-dateYYMMDD-Time-SenderName-EmailSubject-attachment_name.extension
How to use:
Edit the script line “# Configuration” to change where the MSG files will be saved into.
# Configuration
$ExportPath = “C:\OutlookExport”
Run PowerShell as administrator.
Ensure your PowerShell execution policy allows scripts type and agree with the prompt:
Set-ExecutionPolicy -ExecutionPolicy RemoteSigned
run the script and choose the outlook folder to extract, it will be recursive.
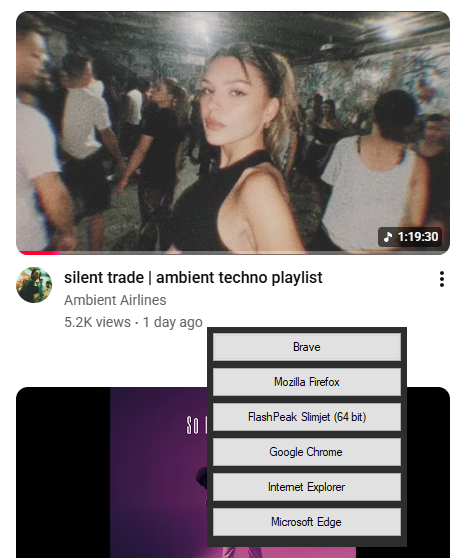
I have a multiple browsers for privacy, one in particular clears itself every time I close it, when I want to open a link and control what browser opens it, I copy it first into the clipboard buffer, which is checked when I press ALT+C to choose what browser should open it.
It tries to detect all your the browsers installed on you system and provide you a menu with which one should launch it
Written in AUTOIT I provide the source code and an EXE.
Situation, whilst watching a youtube video it will jump to another site and pass the url your on to it.
Make a bookmark, edit the url and replace with this line
javascript:(function(){var scriptUrl=‘https://your.website.com/index.php’;var currentUrl=window.location.href;if(currentUrl.includes(‘youtube.com/watch?v=‘)||currentUrl.includes(‘youtu.be/‘)){window.open(scriptUrl+‘?url=’+encodeURIComponent(currentUrl),‘_blank’);}else{alert(‘This bookmarklet only works on YouTube video pages.’);}})();
You can edit youtube.com/watch?v= and youtube.be/ change them to the site you want it to work from, this is for two variants
I’ve created a small site that allows to share one link to your favourite links on the web for WhatsApp and other social media platforms.
Installation Instructions
Follow these steps to deploy the application.
1. Prepare the Environment
-
Upload the
index.phpfile to your web server. -
Create a directory named
datain the same folder asindex.php. -
Ensure the
datadirectory has write permissions (CHMOD 755 or 777 depending on your server environment).
2. Secure the Data Create a .htaccess file inside the data folder with the following line to prevent public access to your CSV and password files:
Apache
Require all denied
3. Initial Configuration
-
Open your browser and navigate to the
index.phpURL. -
The script will detect a new installation and present the Initial Setup screen.
-
Set your admin password. This will create the
auth.txtfile and initialiselinks.csv.
I’ve also included ver.php for bit of technical server info.
User Feature List
The application is divided into a public-facing directory and a private management suite.
Public Features
-
Curated Directory: Displays links organised by logical sections.
-
Automatic Sorting: Lists sections by defined priority and links alphabetically or by custom order within those sections.
-
Responsive Design: The layout adapts for optimal viewing on mobile, tablet, and desktop devices.
Admin Features
-
Secure Authentication: Password-protected access using industry-standard hashing.
-
Brute-Force Protection: Automatic 10-minute lockout after 3 failed login attempts.
-
Visual Reordering: Drag-and-drop interface to move links between sections or reorder entire categories.
-
Live Editing: Edit URLs and descriptions directly within the management list.
-
Flat-File Storage: Operates entirely without a database, using CSV and text files for easy backups and portability.
Operation Instructions
1. Managing Sections and Links
-
Adding Links: Use the “Add New Link” form. Typing a new “Section Title” creates a new section at the top of the list; selecting an existing one adds the link to the bottom of that section.
-
Reordering:
-
To move a Section, click and hold the ☰ icon on the section header and drag it to a new position.
-
To move a Link, use the
::handle to drag it within its section or into a different section.
-
-
Saving Changes: Drag-and-drop movements and text edits are only saved to the server when you click the “Update All Links” button.
-
Deletion: Click the “Delete” button next to any link for immediate removal after confirmation.
2. Security Management
-
Password Updates: Change your access credentials at any time via the “Change Admin Password” section at the bottom of the admin panel.
-
Lockout Recovery: If locked out, you must wait 10 minutes before the system accepts the correct password again. You can also delete auth.txt and it will allow you to set a new password if you forgotten it.
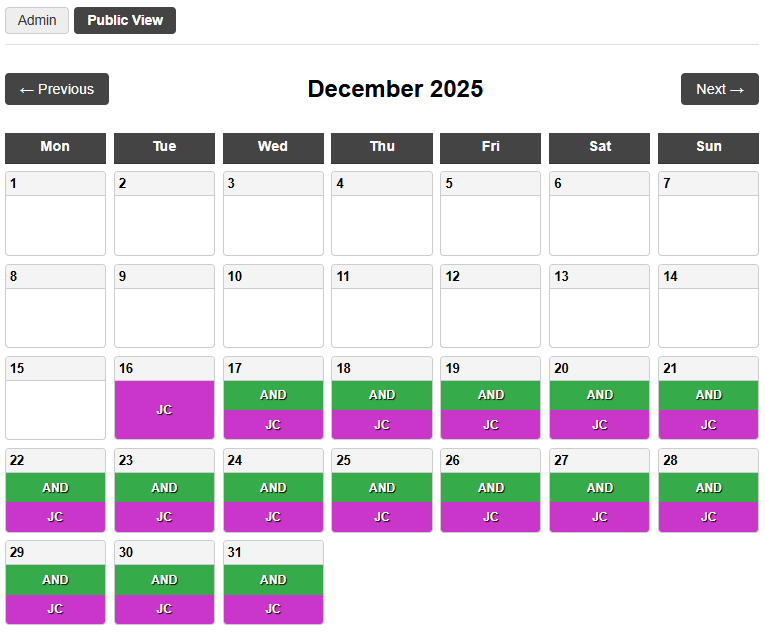
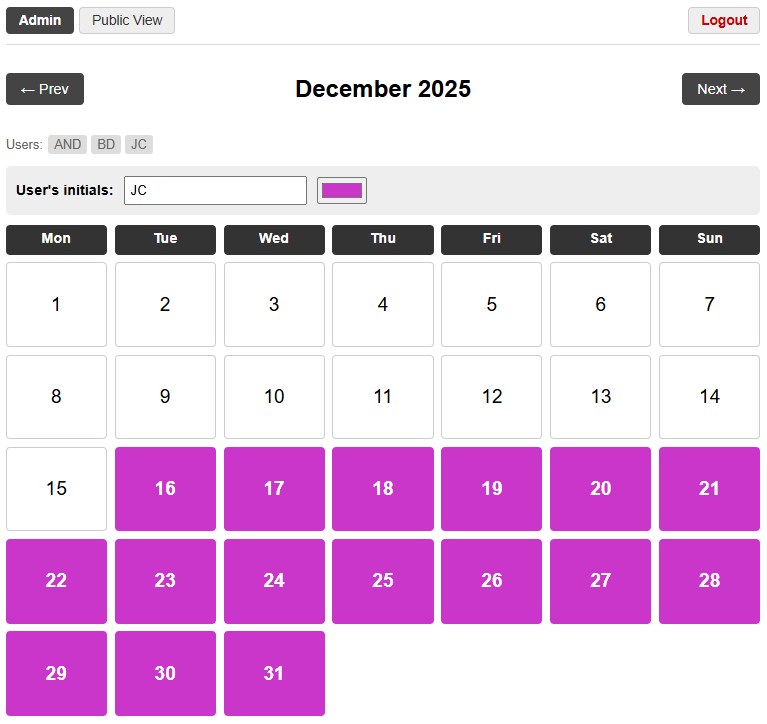
I wanted a simple calendar to share days off between a group and quickly have an overview.
In admin.php has one password for all users for access, edit the file at the top where you see this line and change the password
// Hardcoded password
$adminPassword = “YourSecurePasswordHere”;
To create a calendar when in admin mode just type the new users initials.
Anyone can edit anyone else’s days off.
The calendar data is saved in a flat file per user in the data folder which is created if it doesn’t exist.
To delete a user you have to delete their .txt file in the data folder.
To install just upload the index.php (public view), admin.php (calendar admin).
M4S Saver Extension – Documentation – DOWNLOAD plugin
Overview
This Chrome extension allows you to quickly save .m4s media segments from web pages by pressing the ‘T’ key. It automatically organizes downloads into folders based on the Username found in the URL (or the current Date if no user is found) and prevents duplicate file downloads. The files can be played back using VLC media player
1. Installation
Since this extension is not on the Chrome Web Store, you must install it in “Developer Mode”.
-
Prepare the Folder: Ensure you have all the required files (
manifest.json,background.js,content.js,popup.html,popup.js, andicon.png) inside a single folder namedM4S. -
Open Extensions Menu:
-
Open Google Chrome.
-
Type
chrome://extensionsin the address bar and press Enter.
-
-
Enable Developer Mode:
-
Look for the “Developer mode” toggle in the top-right corner of the page and turn it ON.
-
-
Load the Extension:
-
Click the “Load unpacked” button that appears in the top-left.
-
Navigate to and select the
M4S Saverfolder you created in step 1. -
The extension should now appear in your list.
-
2. Usage Guide
Enabling the Extension
-
Click the Extensions (Puzzle Piece) icon in your Chrome toolbar.
-
Click M4S Saver to open the popup.
-
Toggle the “Enable Plugin” switch to ON.
-
Status text will change to green: “Ready for ‘T’ Key”.
-
Saving Files
-
Navigate to the webpage containing the video/media.
-
Ensure the video has started playing (this allows the extension to capture the
.m4sURL). -
Press the ‘T’ key on your keyboard.
How it Works
-
Smart Folders: The extension looks at your URL.
-
If the URL contains
/users/username, it saves to:Downloads/MS4 Saved/username/filename.m4s -
If no username is found, it saves to a date folder:
Downloads/MS4 Saved/YYMMDD/filename.m4s
-
-
Duplicate Protection: Before downloading, the extension checks your download history. If that specific filename already exists (in any folder), the download is skipped to save space.
3. Troubleshooting
-
“T” Key Doesn’t Work:
-
Ensure the toggle in the popup is set to ON.
-
Reload the webpage after installing or re-enabling the extension.
-
Click anywhere on the page to ensure it has “focus” before pressing ‘T’.
-
-
File Skipped (Not Downloading):
-
Open the extension popup or check the Console (F12). If the file already exists on your computer, the extension intentionally skips it.
-
Delete the existing file from your computer if you wish to download it again.
-
-
Changes Not Applying:
-
If you modify the code, you must go to
chrome://extensionsand click the Reload (circular arrow) icon on the M4S Saver card for changes to take effect.
-
4. File Checklist
Ensure your project folder contains the latest versions of these files:
-
manifest.json(Configuration and permissions) -
background.js(Logic for downloading, duplicate checking, and folder naming) -
content.js(Listens for the ‘T’ keypress) -
popup.html(The user interface) -
popup.js(Saves the toggle state) -
icon.png(Extension icon)