I have a multiple browsers for privacy, one in particular clears itself every time I close it, when I want to open a link and control what browser opens it, I copy it first into the clipboard buffer, which is checked when I press ALT+C to choose what browser should open it.
It tries to detect all your the browsers installed on you system and provide you a menu with which one should launch it
Written in AUTOIT I provide the source code and an EXE.
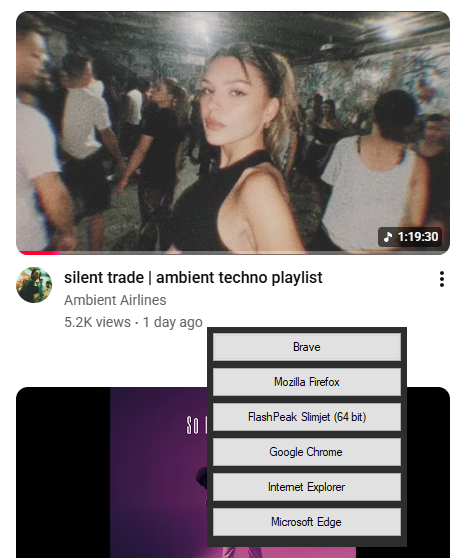
Situation, whilst watching a youtube video it will jump to another site and pass the url your on to it.
Make a bookmark, edit the url and replace with this line
javascript:(function(){var scriptUrl=‘https://your.website.com/index.php’;var currentUrl=window.location.href;if(currentUrl.includes(‘youtube.com/watch?v=‘)||currentUrl.includes(‘youtu.be/‘)){window.open(scriptUrl+‘?url=’+encodeURIComponent(currentUrl),‘_blank’);}else{alert(‘This bookmarklet only works on YouTube video pages.’);}})();
You can edit youtube.com/watch?v= and youtube.be/ change them to the site you want it to work from, this is for two variants
I’ve created a small site that allows to share one link to your favourite links on the web for WhatsApp and other social media platforms.
Installation Instructions
Follow these steps to deploy the application.
1. Prepare the Environment
-
Upload the
index.phpfile to your web server. -
Create a directory named
datain the same folder asindex.php. -
Ensure the
datadirectory has write permissions (CHMOD 755 or 777 depending on your server environment).
2. Secure the Data Create a .htaccess file inside the data folder with the following line to prevent public access to your CSV and password files:
Apache
Require all denied
3. Initial Configuration
-
Open your browser and navigate to the
index.phpURL. -
The script will detect a new installation and present the Initial Setup screen.
-
Set your admin password. This will create the
auth.txtfile and initialiselinks.csv.
I’ve also included ver.php for bit of technical server info.
User Feature List
The application is divided into a public-facing directory and a private management suite.
Public Features
-
Curated Directory: Displays links organised by logical sections.
-
Automatic Sorting: Lists sections by defined priority and links alphabetically or by custom order within those sections.
-
Responsive Design: The layout adapts for optimal viewing on mobile, tablet, and desktop devices.
Admin Features
-
Secure Authentication: Password-protected access using industry-standard hashing.
-
Brute-Force Protection: Automatic 10-minute lockout after 3 failed login attempts.
-
Visual Reordering: Drag-and-drop interface to move links between sections or reorder entire categories.
-
Live Editing: Edit URLs and descriptions directly within the management list.
-
Flat-File Storage: Operates entirely without a database, using CSV and text files for easy backups and portability.
Operation Instructions
1. Managing Sections and Links
-
Adding Links: Use the “Add New Link” form. Typing a new “Section Title” creates a new section at the top of the list; selecting an existing one adds the link to the bottom of that section.
-
Reordering:
-
To move a Section, click and hold the ☰ icon on the section header and drag it to a new position.
-
To move a Link, use the
::handle to drag it within its section or into a different section.
-
-
Saving Changes: Drag-and-drop movements and text edits are only saved to the server when you click the “Update All Links” button.
-
Deletion: Click the “Delete” button next to any link for immediate removal after confirmation.
2. Security Management
-
Password Updates: Change your access credentials at any time via the “Change Admin Password” section at the bottom of the admin panel.
-
Lockout Recovery: If locked out, you must wait 10 minutes before the system accepts the correct password again. You can also delete auth.txt and it will allow you to set a new password if you forgotten it.
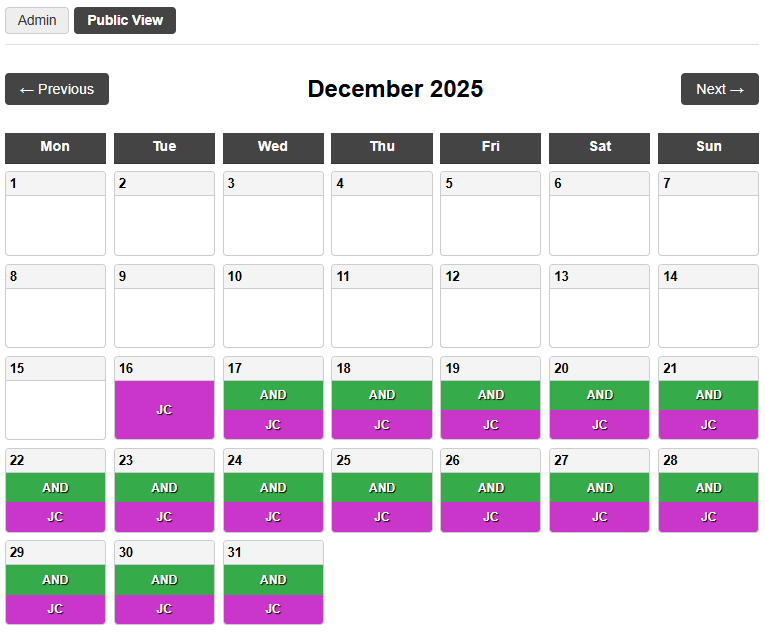
I wanted a simple calendar to share days off between a group and quickly have an overview.
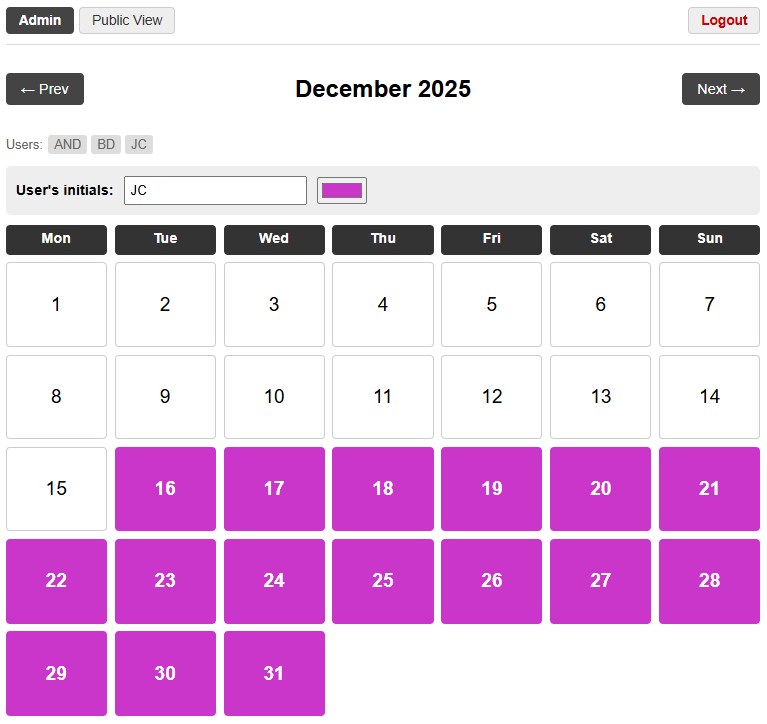
In admin.php has one password for all users for access, edit the file at the top where you see this line and change the password
// Hardcoded password
$adminPassword = “YourSecurePasswordHere”;
To create a calendar when in admin mode just type the new users initials.
Anyone can edit anyone else’s days off.
The calendar data is saved in a flat file per user in the data folder which is created if it doesn’t exist.
To delete a user you have to delete their .txt file in the data folder.
To install just upload the index.php (public view), admin.php (calendar admin).
M4S Saver Extension – Documentation – DOWNLOAD plugin
Overview
This Chrome extension allows you to quickly save .m4s media segments from web pages by pressing the ‘T’ key. It automatically organizes downloads into folders based on the Username found in the URL (or the current Date if no user is found) and prevents duplicate file downloads. The files can be played back using VLC media player
1. Installation
Since this extension is not on the Chrome Web Store, you must install it in “Developer Mode”.
-
Prepare the Folder: Ensure you have all the required files (
manifest.json,background.js,content.js,popup.html,popup.js, andicon.png) inside a single folder namedM4S. -
Open Extensions Menu:
-
Open Google Chrome.
-
Type
chrome://extensionsin the address bar and press Enter.
-
-
Enable Developer Mode:
-
Look for the “Developer mode” toggle in the top-right corner of the page and turn it ON.
-
-
Load the Extension:
-
Click the “Load unpacked” button that appears in the top-left.
-
Navigate to and select the
M4S Saverfolder you created in step 1. -
The extension should now appear in your list.
-
2. Usage Guide
Enabling the Extension
-
Click the Extensions (Puzzle Piece) icon in your Chrome toolbar.
-
Click M4S Saver to open the popup.
-
Toggle the “Enable Plugin” switch to ON.
-
Status text will change to green: “Ready for ‘T’ Key”.
-
Saving Files
-
Navigate to the webpage containing the video/media.
-
Ensure the video has started playing (this allows the extension to capture the
.m4sURL). -
Press the ‘T’ key on your keyboard.
How it Works
-
Smart Folders: The extension looks at your URL.
-
If the URL contains
/users/username, it saves to:Downloads/MS4 Saved/username/filename.m4s -
If no username is found, it saves to a date folder:
Downloads/MS4 Saved/YYMMDD/filename.m4s
-
-
Duplicate Protection: Before downloading, the extension checks your download history. If that specific filename already exists (in any folder), the download is skipped to save space.
3. Troubleshooting
-
“T” Key Doesn’t Work:
-
Ensure the toggle in the popup is set to ON.
-
Reload the webpage after installing or re-enabling the extension.
-
Click anywhere on the page to ensure it has “focus” before pressing ‘T’.
-
-
File Skipped (Not Downloading):
-
Open the extension popup or check the Console (F12). If the file already exists on your computer, the extension intentionally skips it.
-
Delete the existing file from your computer if you wish to download it again.
-
-
Changes Not Applying:
-
If you modify the code, you must go to
chrome://extensionsand click the Reload (circular arrow) icon on the M4S Saver card for changes to take effect.
-
4. File Checklist
Ensure your project folder contains the latest versions of these files:
-
manifest.json(Configuration and permissions) -
background.js(Logic for downloading, duplicate checking, and folder naming) -
content.js(Listens for the ‘T’ keypress) -
popup.html(The user interface) -
popup.js(Saves the toggle state) -
icon.png(Extension icon)
Phase 1: Extract the Subtitles
The best tool for this is Subtitle Edit (free and open source). It handles both text and image subtitles.
-
Download and open Subtitle Edit.
-
Drag your MKV file into the main window.
-
If the subtitle is Text (SRT/ASS): The text will appear immediately in the list view.
-
Go to
File->Save as...and save it as an .srt file.
-
-
If the subtitle is Image (PGS/VobSub): A window will pop up asking to “Import/OCR” the subtitle.
-
You must perform the OCR (Optical Character Recognition) to convert the images into text.
-
Click “Start OCR” and correct any reading errors it finds.
-
Once finished, save as .srt.
-
Note: You now have a plain text file (.srt) that you can copy-paste into an AI tool for translation.
Phase 2: Add Translated Subtitles Back to MKV
The standard tool for this is MKVToolNix GUI. It allows you to “remux” (re-package) the video without losing quality.
-
Download and open MKVToolNix GUI.
-
Drag and drop your original MKV file into the “Input” box.
-
Drag and drop your newly translated
.srtfile into the same box. -
In the “Tracks” list below:
-
Uncheck the old subtitle track (if you want to remove it).
-
Check the new subtitle track.
-
Optional: Click the new subtitle track and set the “Language” on the right sidebar.
-
-
Click Start multiplexing at the bottom.
-
Subtitle Edit: GitHub Releases Page
-
Instruction: Scroll to the “Assets” section of the latest release and download the file ending in Setup.exe.
-
-
MKVToolNix: Official Download Page
-
Instruction: Select your operating system (e.g., “Windows”) and download the installer (usually 64-bit).
-
Here is a prompt optimised to prevent the AI from breaking the strict .srt timecode structure.
You are a professional translator. Translate the subtitle file below into [Target Language].
Strict Rules:
Do not alter, translate, or remove any timecodes (e.g.,
00:00:20,000 --> 00:00:22,000) or index numbers.Only translate the dialogue text.
Preserve the original line breaks and spacing exactly.
Output the result in a code block so I can easily copy it.
Input: [PASTE SUBTITLES HERE]